Mooplog

All articles

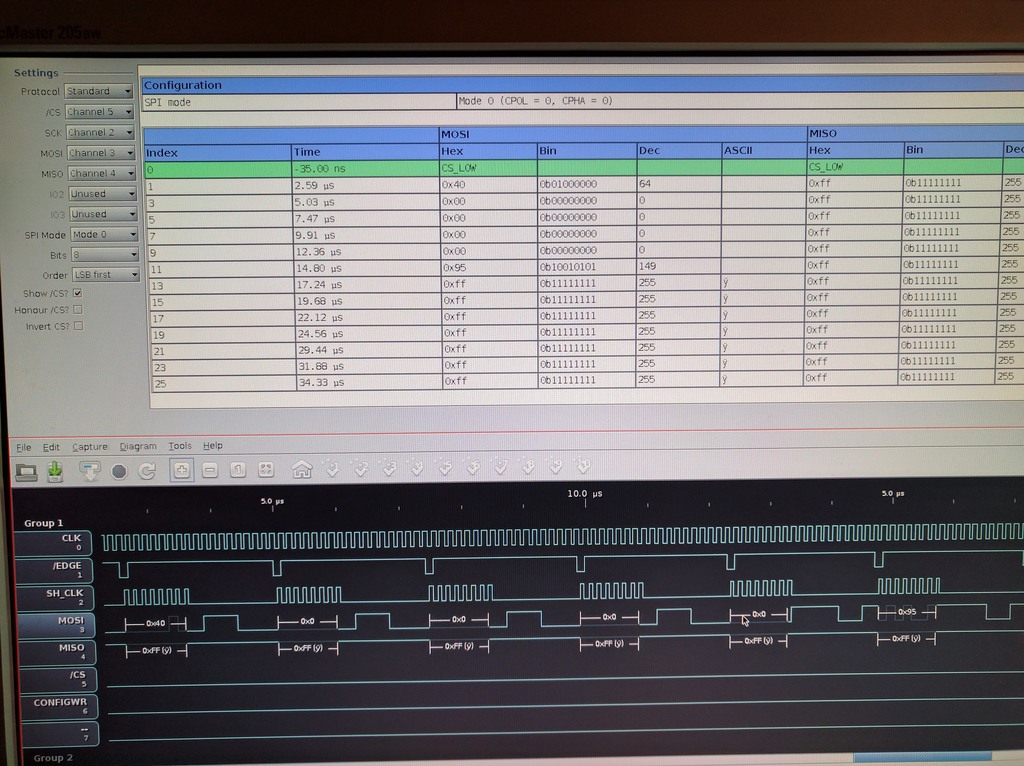
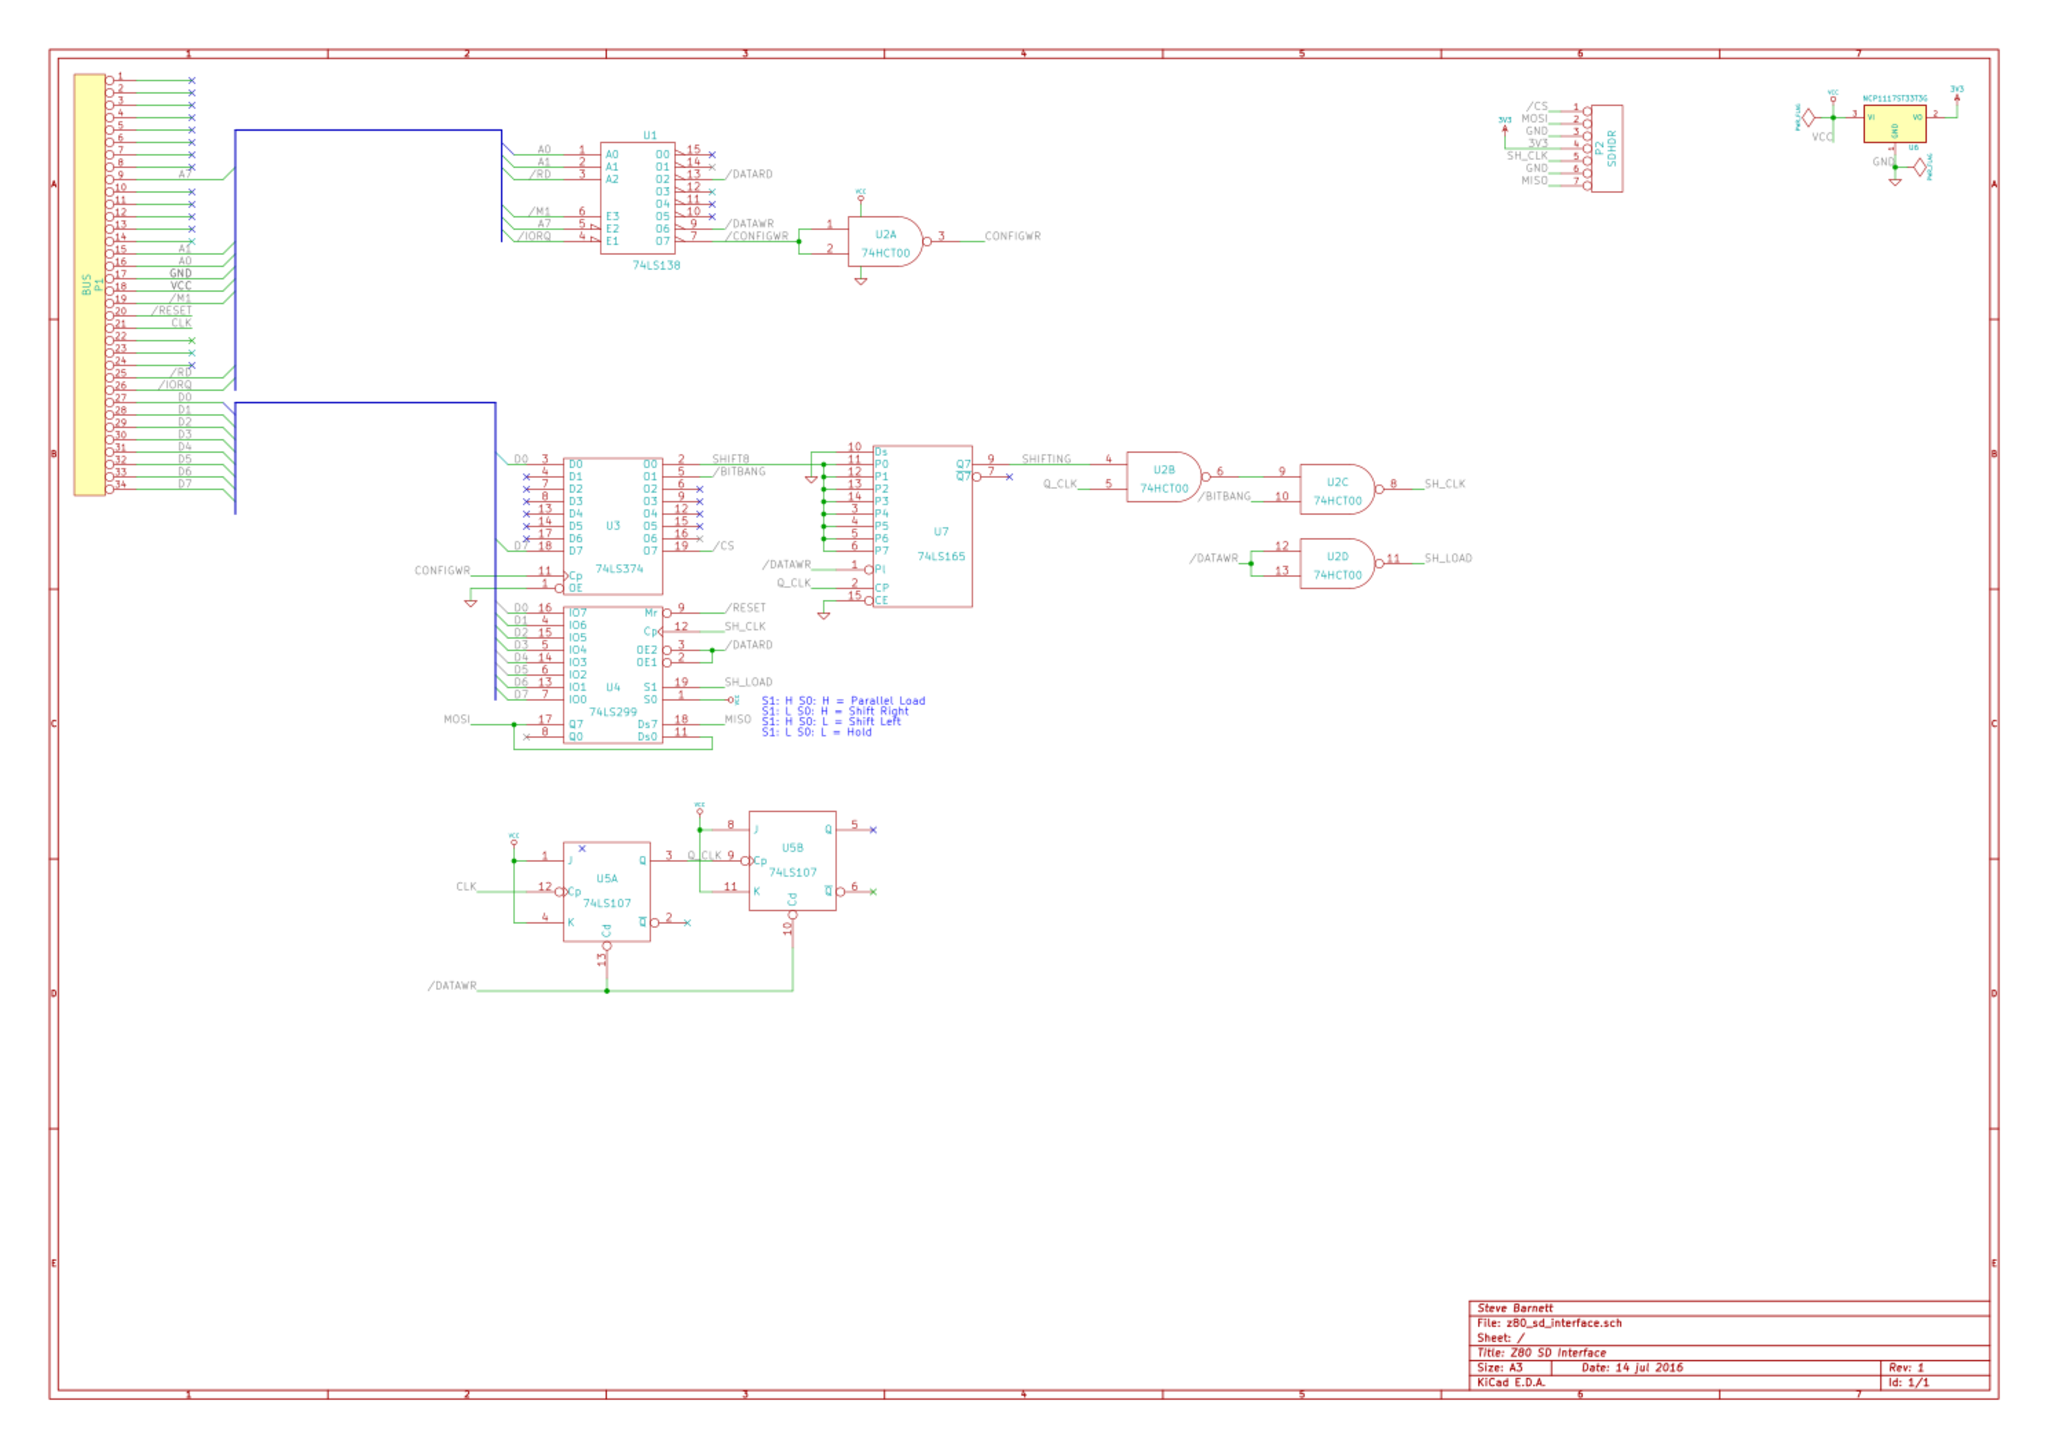
New Site With Pelican Static Site Generator

You may noticee that this site now looks completely different.

I decided that I was bored of paying for an AWS instance to host WordPress, and restarting PHP when it crashed, and so on. I also got tired of the massive stall when my tiny AWS instance struggled to create …

Published:

By moop

RetroChallenge 2016/10 - One bodge to fix them all

It's two days past the deadline, but I found an extra moment to work on my SD card interface today and I have it working!

I switched the clock output to the SD card from SH_CLK to /SH_CLK to move the rising edge of the clock to a point where …

Published:

By moop

Retrochallenge 2016/10 - Tools

During Retro Challenge I needed a way to run machine code on my rc2014, as BASIC was incapable of the performance needed to initialise the SD card in bitbang mode.

I didn't (and still don't) have an EEPROM burner when I first got my rc2014, and although the version of …

Published:

By moop

Retrochallenge 2016/10 - Deadline

I'm at my deadline for RetroChallenge 2016/10 and unfortunately I'm tantalisingly close to having something that works, but not quite there.

I have the bitbang/slow mode working and generating pulses that match the output I get from my Bus Pirate when using it to talk to the SD …

Published:

By moop

Retrochallenge 2016/10 - State of Play

As it stands my RetroChallenge entry is close to working, but not quite there.

The fast mode appears to work and I was able to decode the SPI packets sent to the SD card with OpenLogicSniffer's SPI analyser module.

Decoded Messages

The picture above shows the signals and the decoded data for …

Published:

By moop

Retrochallenge 2016/10 - Breadboard Fun

Having finally found time to start breadboarding my SD card interface I first made sure that the edge trigger circuit I had tested in ModelSim would work when built with real components.

An issue I had encountered previously when breadboarding RC2014 peripherals was that if I wanted to disconnect the …

Published:

By moop

Retrochallenge 2016/10 - Due diligence

To avoid the work done designing my SD interface being wasted I decided to verify the concept before going any further.

I used my Bus Pirate to verify that the SD card I have would respond to the commands I expected using the protocol I expected.

The Bus Pirate supports …

Published:

By moop

Retrochallenge 2016/10 - Building retro computers with modern tools

I've been struggling for free time this month for poking around with breadboards and other fun things. To work around this, and still (hopefully) get my RetroChallenge entry done, I decided to use a simulator so I could work on it with my laptop whenever and wherever there was time …

Published:

By moop

Retrochallenge 2016/10 - Previous version and problems

In my previous post I promised to show the previous implementation of my Z80 SD interface, and to run through the problems which I intend to fix this month.

Original Z80 SD Interface Schematic

The 74138 (U1) in the top left of the schematic is used to detect and decode IO reads and writes from …

Published:

By moop

Retrochallenge 2016/10

I decided to join in with ` <http://www.wickensonline.co.uk/retrochallenge-2012sc/>`__Retrochallenge 2016/10 this October. I'm also hoping this will provide some incentive to write more posts and updates about other projects once I'm back into the swing of things!

RC2014 Z80 computer

My goal for this Retrochallenge is to finish …

Published:

By moop

SpeedTwin Update

Recently I've been focussed on finishing off my radio controlled model SpeedTwin ST-2. This guy is not the biggest model I've built in terms of wingspan, but it wins in terms of chunkiness and complexity. I started it in 2012, but it stalled at some point because everything was blocked …

Published:

By moop

CNC cut control horns

I was at a loose end during today's bank holiday so I decided to do a mini-project (with bonus recycling features) and make a set of control horns for my radio controlled SpeedTwin ST-2.

Control horns in DraftSight

After deciding on a sensible size for the control horns I drew them up in DraftSight …

Published:

By moop

Hot Wire Cutter

While building my model SpeedTwin ST2 I needed to neatly cut some foam. Since I had a bunch of 6mm laser safe ply available and needed to cut some other bits the next day I decided to design my own hot wire cutter and cut the parts out at the …

Published:

By moop

Foobot

Foobot is a project I started around November 2014. It's still a work in progress, but the time when I should have written it up is more than due.

Foobot

Foobot is robot table football game, with two teams of two tiny adorable robots. The robots are controlled by classic Nintendo …

Published:

By moop

Tricopter

Finished Tricopter

I've been neglecting this blog recently due to various distractions but have several projects I want to write up. Around April I found myself with the urge to build a multicopter. In the end I settled on a tricopter design as it's a little unusual and because the wider angle …

Published:

By moop

eShapeOko Part 3 - Tidying up

Having had the ShapeOko for over a year now I've used it for quite a few projects, but nowhere near as many as I intended. Part of the reason for this is that the controller for the machine was still rather jury rigged so setting it up was a hassle …

Published:

By moop

Simple PCB drilling jig

Drilling jig in action

Recently I've been making a lot of printed circuit boards. One of the common problems I run into is aligning holes correctly when hand drilling. This is especially troublesome on boards with large arrays of pins, such as my hexapod controller (I promise I'll write that up soon!). A misaligned …

Published:

By moop

Arcade Control Panels

Charlie's SuperGun had me inspired to build my own at some point, but I thought I'd start at the other end and build some appropriate controllers first. Partly as a birthday present to myself I decided to make a pair of arcade control panels.

After a long time reading SlagCoin …

Published:

By moop

Loot of the Forest

I just finished participating in the 28th Ludum Dare game jam. This time around the theme was 'You Only Get One'.

I chose to interpret this fairly literally as a game mechanic and came up with Loot of the Forest. It's a game about bribing forest guardian creatures as you …

Published:

By moop

STOMP STOMP STOMP STOMP

I've been a bit quiet on here for a while, and slacking on the PCB milling experiments I've been meaning to do, though I have made some progress on that front.

Anyway, here's what I got sidetracked by building:

This is a small budget hexapod, using 18 of the cheapest …

Published:

By moop

The Minigun (A mini Super Gun)

Guest post by Charlie again as he continues his quest to take over Moop's blog with his super long posts:

TL;DR?

Then here's a video instead...

http://youtu.be/AGSSvxihYZs

Preamble

Recently I got into arcade boards. They can be found reasonably cheaply on eBay and as most use …

Published:

By charlie

eShapeOko Part 2 - Mechanicals

Building the mechanical parts of the eShapeOko was fairly straightforward, but there are some problems and modifications I made that are worth writing about.

eShapeOko parts

The first task of the assembly was to tap the MakerSlide sections to add a screw thread. This was my first try at tapping anything, but …

Published:

By moop

eShapeOko Part 1

I was partway through writing a draft for a post about PCB milling when I realised I hadn't yet written anything about the machine I've been using, so I think it's about time for a post about the eShapeOko CNC machine I built.

I ordered the mechanical kit only, so …

Published:

By moop

Lightwave RF Mood Controller Hack

It's me, Charlie again, continuing with my scheme to take over Moop's blog with nothing but home automation articles.

Readers of this blog will know that I've been playing around with LightwaveRF's home automation stuff a lot recently. Mainly setting up voice control systems for it. One thing that irked …

Published:

By charlie

Siri, control my lights

Once again, it's not moop but Charlie, so we're talking home automation instead of planes.

My last video on home automation turned out to be surprisingly popular! So, to celebrate I've done a quick follow up on the same idea. One thing people commented on was that I should have …

Published:

By charlie

Voice Controlled Lights

It's not moop today but me again returning as a guest contributor. So, it's not planes or lathes today but wireless plugs and stuff.

If you read my last blog post (http://www.moop.org.uk/index.php/2013/05/27/homemade-wireless-plug/) you'll know that I tried building a cheap …

Published:

By charlie

Unholy Chalupa MKIII

Beware: unreasonably long post ahead. I probably should've posted this in chunks, but was hoping to fly the model first. That always seemed to be just around the corner, but thanks to British weather and seasonal man-flu that still hasn't happened.

The original Chalupa is a model aircraft I designed …

Published:

By moop

Homemade Wireless Plug

Hello readers! First off, if you were expecting one of Moop's awesome posts then prepare for disappointment as today you have me, Charlie, posting instead as a special guest contributor.

The design

So, I wanted to automate my home. Nothing too exciting, just turn off an on lights and plug …

Published:

By charlie

Update

I've had a sudden burst of motivation this morning, possibly due to a nice model flying day finally turning up (maybe the second this year!). I thought I'd use this to make a post since I've not updated in a while. I have a bunch of projects on the go …

Published:

By moop

Glider Restoration Part 4 - Finishing touches

The weather today was unexpectedly awesome so it would have been a crime to not try and take the glider out for a flight. I had to quickly make a few finishing touches before it was ready to go.

First off the connectors were soldered to the motor and ESC …

Published:

By moop

Glider Restoration Part 3 - Fuselage

With the wings complete I moved on to restoring the fuselage of the glider. I'd originally intended to  use the existing fuselage and just straighten it up. Unfortunately, when I came to look at it closer the plywood construction had warped more than I thought. I started trying to disassemble …

Published:

By moop

Glider Restoration Part 2 - Finishing the wings

To finish off the wingtips, I cut off the spars at an angle and cut some tip skins based on the plans. These were glued and pinned into place then sanded to provide a smooth finish and to blend in with the leading and trailing edges.

Wingtips sheeted and sanded

With the tips finished …

Published:

By moop

Space saving wall art

I seem to have too many model planes nowadays, and storage was fast becoming a problem. During a bout of boredom, I dug up some screws and hooks and attached them to the wall above my desk. Now they look cool, and I have loads of extra space!

Space saving wall art

Published:

By moop

Model glider restoration

I've had a Precedent Hi-Fly model glider lying around waiting to be repaired for years now. I originally built it with my dad. Well, he did most of the building; I suspect my main contribution was nagging him to get it finished. Unfortunately, we didn't really know what we were …

Published:

By moop

Mittens and Snowdrop action figures

I got close to biting off more than I could chew recently in the process of making a Secret Santa gift.  With Mata as my 'victim' I decided to make some little action figures of the Mittens and Snowdrop characters from one of his animations.

The initial plan was to …

Published:

By moop

DIY Mini Lathe

Mini Lathe

I needed some smooth round parts recently for some models I was building and chose to take an unconventional approach by building a mini lathe on which to turn them.

The parts were designed in Draftsight and cut from 3mm ply on Nottingham Hackspace's laser cutter. The lathe is built …

Published:

By moop

About

Hi, I'm moop and I have a habit of making things.

Hopefully this will turn into a place to write about them, instead of resigning them to the back of a cupboard.